DeletedUser3
There are a lot of different ways to recreate wood. In all my tutorials, I'll not bother showing you all the different ways and instead I'll focus on exposing you to the gamut of tools in Photoshop. Normally I do things quick and easy because, in business, the long and convoluted way with hour-long rendering and a thousand steps, is just plain stupid. Sure, you might end up with a wood that looks so real a termite may end up attacking your screen, but geez... if that's what you're aiming for, just grab your friggin' camera. So, anyway, here I provide a way, from scratch, that is quick and easy once you get used to doing it (although if you're following this tutorial, it will "feel" long and difficult). You can apply some or all of these actions, depending on just how "real" you want your wood to look.
Wood
1. Create a new file. File -> New (Ctrl/Cmd+N) -> 1200 x 1440 pixels in size, RGB, transparent mode.
2. Use Zoom (Alt/Option+Spacebar+mouseclick) to bring the entire image to display on your screen.
3. Click on your Color Palette (Window -> Color) and choose an orange-brown color for your foreground color (don't worry too much about the color, we'll be messing with it later).
4. Grab your Paint Bucket
 (Shift+G+G) and paint the entire default layer.

5. Create a new layer Layer -> New (Shift+Ctrl/Cmd+N).
6. Create your own brush. How you ask? Well well, a tutorial within a tutorial:
8. Click on the Options bar and change the brush type to Soft Brush (the one you just made, scroll all the way to the bottom).
9. Click on your Color Palette (Window -> Color) and choose a dark brown color for your foreground color.
10. Okay, now we paint. Real simple. Make sure you're on your new layer (you created it in step 5). Now paint lines going up and down. The quick and easy way is to zigzag up and down in one complete action. In a pattern like this:

Obviously you won't be painting outside of the box. Anything outside of the box will not be displayed, like so:

Alright, because we're using such a soft brush, your lines won't be so strong and obvious. In fact, they'll be very hard to see, particularly with the orange-brown background. But that's okay, it's what we're aiming for:

11. Next, let's mess with those lines. Click Filter -> Distort -> Shear. Modify the wave to be rather eccentric, like so:

Once you've applied the above filter, your work should look something like this:

12. Now, Click Filter -> Blur -> Motion Blur. Choose the settings of 170 degrees @ 15 pixels, they work well:

13. Layer -> Merge Visible. You're merging the lines with the background.
14. Filter -> Noise -> Add Noise. Choose 5%, Gaussian Distribution, Monochromatic

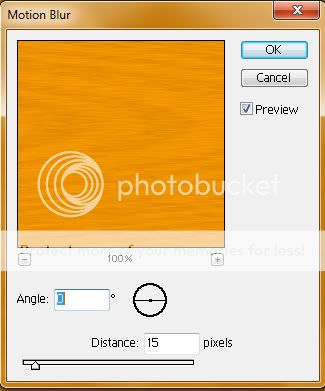
15. Filter -> Blur -> Motion Blur. Choose the settings of 0 degrees @ 15 pixels:
Zoom in, and your wood should look something like this:

That's your basic wood. It's not ready for primetime yet. Now let's make some wood planks.
Wood Planks
1. Grab your image and angle it. Click Edit -> Free Transform (Ctrl/Cmd+T), giving it about a 20 degree angle:


2. Now let's cut a bunch of wood planks out.
4. At this point I'm going to remind you to name each wood plank and the corresponding Sets.

5. Give each wood plank a layer style. Click (on the bottom of the layer window) Add a layer style -> Bevel and Emboss. Give the settings as shown below:

6. Hit each wood plank layer with a separate Filter -> Render -> Lighting Effects, with the below settings:

And there you are, wood planks:

Optional
*Individualizing (optional)
I like to make my wood planks look unique and aged. For this, I do a few things, any of which you can opt to do:
1. Cut a few holes in them, on or about where it looks like there would be a knot, using the Marquee tool (Ctrl/Cmd+M).
2. Use the Transform tool (Ctrl/Cmd+T) to flip some of the woods horizontally and/or vertically (I recommend flipping even numbers horizontally, and numbers 1,2,5,6 vertically).
3. Hit them each, individually, with the Curves tool Image -> Adjustments -> Curves (Ctrl/Cmd+M), making "very subtle" changes to the curve.

4. Use the Eraser tool (Shift+E), with an erratic brush (Brush Picker in Options Bar - Chalk 23 pixels), to cut a little uniqueness to edges of some of those wood planks.
Tiles
1. Working with one Set, move your wood planks with the Move tool (Shift+V) in this manner:

Now you have intersecting plank Sets, which you can tile.
2. Do the same with the second Set. Make sure they fit well with the other Set, like Legos.

3. Copy Sets to make more of these tiles (as many as your heart desires).
4. Move these Sets around to cover a good portion of your Work Area.

5. Now Merge all your Sets and Layers together. Layer -> Merge Visible (Shift+Ctrl/Cmd+E)
6. Use the Crop tool (Shift+C) to cut the entire Work Area, making sure to remove any incomplete areas where your planks aren't covering.

7. Now, create a new layer. Layer -> New (Shift+Ctrl/Cmd+N)
8. Click on that new layer, change your foreground color to Black (Window -> Color) and move that layer under the merged wood plank layer.
9. Add a layer style Layer -> Layer Style -> Pattern Overlay and pick something that gives just a little variation to that Black layer. Change the Opacity of that pattern overlay to about 30%.
10. Now, return to your wood plank montage and adjust the your wood using the Image Saturations Image -> Adjustments -> Hue/Saturation (Ctrl/Cmd+U). Alternatively, you can use the Image Variations tool. Image -> Adjustments -> Variations.
If you Zoom in on your work, you should see something like this:

You're done!
Wood
1. Create a new file. File -> New (Ctrl/Cmd+N) -> 1200 x 1440 pixels in size, RGB, transparent mode.
2. Use Zoom (Alt/Option+Spacebar+mouseclick) to bring the entire image to display on your screen.
3. Click on your Color Palette (Window -> Color) and choose an orange-brown color for your foreground color (don't worry too much about the color, we'll be messing with it later).
4. Grab your Paint Bucket
5. Create a new layer Layer -> New (Shift+Ctrl/Cmd+N).
6. Create your own brush. How you ask? Well well, a tutorial within a tutorial:
- Create a new file. File -> New (Ctrl/Cmd-N) -> 64 x 64 pixels in size, Grayscale, transparent mode.
- Use Zoom (Alt/Option+Spacebar+mouseclick) to bring the entire image to display on your screen.
- Click and Hold on the Paint Brush until the pencil tool
is displayed (Shift+B+B).

- Click on the Options bar and change the brush type/size to 1 pixel.

- Put a handful of dots on your layer.

- Give it a little blur - Filter -> Blur

- Select -> All (Ctrl/Cmd+A)
- Go to Edit -> Define Brush (near the bottom of the dropdown menu)
- Give it a name (Soft Brush is good). *poof*, you're done.
8. Click on the Options bar and change the brush type to Soft Brush (the one you just made, scroll all the way to the bottom).
9. Click on your Color Palette (Window -> Color) and choose a dark brown color for your foreground color.
10. Okay, now we paint. Real simple. Make sure you're on your new layer (you created it in step 5). Now paint lines going up and down. The quick and easy way is to zigzag up and down in one complete action. In a pattern like this:
Obviously you won't be painting outside of the box. Anything outside of the box will not be displayed, like so:
Alright, because we're using such a soft brush, your lines won't be so strong and obvious. In fact, they'll be very hard to see, particularly with the orange-brown background. But that's okay, it's what we're aiming for:
11. Next, let's mess with those lines. Click Filter -> Distort -> Shear. Modify the wave to be rather eccentric, like so:
Once you've applied the above filter, your work should look something like this:
12. Now, Click Filter -> Blur -> Motion Blur. Choose the settings of 170 degrees @ 15 pixels, they work well:
13. Layer -> Merge Visible. You're merging the lines with the background.
14. Filter -> Noise -> Add Noise. Choose 5%, Gaussian Distribution, Monochromatic
15. Filter -> Blur -> Motion Blur. Choose the settings of 0 degrees @ 15 pixels:
Zoom in, and your wood should look something like this:
That's your basic wood. It's not ready for primetime yet. Now let's make some wood planks.
Wood Planks
1. Grab your image and angle it. Click Edit -> Free Transform (Ctrl/Cmd+T), giving it about a 20 degree angle:
2. Now let's cut a bunch of wood planks out.
- Use the Rectangular Marquee tool (Shift+M) to choose an area about the shape/size of a wood plank.

- Click on the Channels tab, then Save selection as channel. Your channel is now Ctrl/Cmd+4.
- Click on your channel (should be named Alpha1), then deselect all Select -> Deselect (Ctrl+D).
- While still in the Alpha channel, cut on the edges of your selection, using the Eraser tool (Ctrl/Cmd+E) with an erratic brush (Brush Picker in Options Bar - Chalk 23 pixels).

- Once you've done this, use the Wand tool (Shift+W) to choose the white area in the Alpha channel.
- Return to your Layers, click on the wood layer and Copy/Paste (Ctrl/Cmd+C, Ctrl/Cmd+V). A new layer will have been created in the shape of your rough-edged wood plank.

- Return to your Channel (Ctrl/Cmd+4), choose the white area.
- Return to your Layers, click on the wood layer, move the chosen area with your mouse, and Copy/Paste (Ctrl/Cmd+C, Ctrl/Cmd+V). What you're doing is making multiple wood planks, all a little bit different.
- Rinse and repeat until you have about eight planks (or more if you're crazy).
4. At this point I'm going to remind you to name each wood plank and the corresponding Sets.
5. Give each wood plank a layer style. Click (on the bottom of the layer window) Add a layer style -> Bevel and Emboss. Give the settings as shown below:
6. Hit each wood plank layer with a separate Filter -> Render -> Lighting Effects, with the below settings:
And there you are, wood planks:
Optional
*Individualizing (optional)
I like to make my wood planks look unique and aged. For this, I do a few things, any of which you can opt to do:
1. Cut a few holes in them, on or about where it looks like there would be a knot, using the Marquee tool (Ctrl/Cmd+M).
2. Use the Transform tool (Ctrl/Cmd+T) to flip some of the woods horizontally and/or vertically (I recommend flipping even numbers horizontally, and numbers 1,2,5,6 vertically).
3. Hit them each, individually, with the Curves tool Image -> Adjustments -> Curves (Ctrl/Cmd+M), making "very subtle" changes to the curve.
4. Use the Eraser tool (Shift+E), with an erratic brush (Brush Picker in Options Bar - Chalk 23 pixels), to cut a little uniqueness to edges of some of those wood planks.
Tiles
1. Working with one Set, move your wood planks with the Move tool (Shift+V) in this manner:
Now you have intersecting plank Sets, which you can tile.
2. Do the same with the second Set. Make sure they fit well with the other Set, like Legos.
3. Copy Sets to make more of these tiles (as many as your heart desires).
4. Move these Sets around to cover a good portion of your Work Area.
5. Now Merge all your Sets and Layers together. Layer -> Merge Visible (Shift+Ctrl/Cmd+E)
6. Use the Crop tool (Shift+C) to cut the entire Work Area, making sure to remove any incomplete areas where your planks aren't covering.
7. Now, create a new layer. Layer -> New (Shift+Ctrl/Cmd+N)
8. Click on that new layer, change your foreground color to Black (Window -> Color) and move that layer under the merged wood plank layer.
9. Add a layer style Layer -> Layer Style -> Pattern Overlay and pick something that gives just a little variation to that Black layer. Change the Opacity of that pattern overlay to about 30%.
10. Now, return to your wood plank montage and adjust the your wood using the Image Saturations Image -> Adjustments -> Hue/Saturation (Ctrl/Cmd+U). Alternatively, you can use the Image Variations tool. Image -> Adjustments -> Variations.
If you Zoom in on your work, you should see something like this:
You're done!