• We are looking for you!
    Always wanted to join our Supporting Team? We are looking for enthusiastic moderators!
    Take a look at our recruitement page for more information and how you can apply:
    Apply

Pushing the Continent to the Space Ages in Progressive/Industrial Age v1.0.2

KingJMobile

Active Member

A Brief Introduction​

This is my journal guide for fighting the Continent Map to the Space Ages as early as the Industrial Age, in fact (though I am in the Progressive Era). In this journal guide, I will state information and theoretical calculations to work out the costs and effectiveness of all these strategies.

First things first, if you haven’t already, check out Uberhelp’s Higher Era Units guide. If you can’t do that, then you are most definitely not ready for the challenges ahead.

Now, you might be wondering: why the hell am I even doing this? Mainly to get expansions, which is undoubtedly one of the most valuable things in FoE. My other reasons are that I just want to get a taste of all the Space Age units (if possible) and try something more challenging with my units (ever since GE level 4 has become a cakewalk).

Army Boosts and Preparation​

Before we start, here is my current status:
  • I am in Progressive Era, and I have acquired all possible higher-era units from quests (explained below).
  • I have around 220 million coins and 260 million supplies which should be sufficient for scouting and expansion costs.
  • I also have a 500-600% boost in attack and defense. This will likely increase. As much as I would like to increase my attack%, it would be more useful to increase my defense%, particularly as the AI does not target rogues first, I will be expecting to take a lot of damage. See the Knowledge is Power Part to understand why.
  • I am currently in Part 1 of the Virtual Future Map. I will be taking the Continent Map nice and slowly.
  • I have not saved any goods for negotiations. I will be fighting the entire way.

Army Setup with Units of Interest​

The main 3 Units we will be using in the continent are Hover Tanks, Turturrets, and Combat Drones. We may also use Sub Cruisers, Hydroelectric Eels, and Mantas. The standard army combination will be 1 unit with 7 rogues, with an exception for the Turturrets and Rail Guns in some cases (4+4 or 4+2+2).

Hover Tanks: These will be the go-to unit that we’ll be using to push for most of our fights. Stealth on Plains already makes anything without Blast or Power Shot completely short work for the Hover Tank, not to mention their rather long range too. Rogues will most likely be evenly converted as they have Stealth on the first tile too. In addition, its Force Field ability is very strong as well. Melee and Dragon Breath units may pose a slight risk to them. Its biggest fear is anything with Blast or Power Shot and can attack the Hover Tank before the Hover Tank can move.

Turturrets: Turturrets work very nicely with their Mortar ability. (It’s a pity you can’t get Rocket Troops instead). As far as they are concerned, anything with Flying or Stealth or can move before them and attack them on the first turn is a risk to them. Against other units, however, the Turturret can be used in numbers to maximize their Mortar effect. As an artillery unit, their long-range is extremely useful.

Combat Drones: The Combat Drone will be our Flying unit here. They have a nice attack, but they are limited by their rather low defense. Its movement and range are amazing, and they will serve as our solution for artillery units. They do struggle against other fast units that can reach them on the first turn, however, and they are rather weak against other units too; mainly due to their low defense.

Hydroelectric Eel: The Hydroelectric Eel is better than the Combat Drone with its better defense and very high initiative (allowing them to move out of the way before other units can attack them). It falls quite short, however, as they are not Flying, so they are vulnerable to artillery, and as bushes are non-existent past the Virtual Future, it will lose its Stealth advantage. In the Space Age Venus, these will replace the Combat Drone as the Power Dragon will be able to attack Flying units anyway.

Sub Cruiser/Manta: These two are renowned for their Contact ability. Each has its own strengths and weaknesses, though. The Sub Cruiser has a longer range at the cost of a lower initiative and attack and defense whereas the Manta, despite its smaller range, has better initiative and attack and defense. Both of them are not as useful, given that their Contact is less useful when the AI doesn’t target rogues first.

As a final note, my calculations will not always be exact, but you should have an approximate idea of what to achieve. Note that whilst the theoretical boosts needed for a comfortable fight are rather high, you can still do it with lower boosts (just not as easily).

Knowledge is Power​

Before we even begin, we must understand how AI will work:
  1. The AI will usually target units closest to it first, be it a rogue or any other unit.
  2. The AI may focus fire on particular units (should they be in closest or close proximity with other units in a clump).
  3. The AI is lazy – it will not move for as long as there are units within their attacking range. This is how I sometimes manage to take out Flying units using untransformed rogues (when I am using Turturrets).
  4. There is an exception to the way the AI controls Blast units: it will try to take advantage of its Blast attack bonus by moving forward and with that, it may then focus fire on specific units (making them rather painful).

Here are good tactics to develop:
  1. Manually fight: do not be tempted to auto-battle unless you are ready to expect losses or know that the enemy cannot make a stand against you. Take your time; there is no rush needed.
  2. Use the rogue in, unit out strategy. When a rogue gets transformed, pull it back and slightly push your other rogues on or near its position to ensure as many rogues are transformed as possible.
  3. Remember to keep your real unit behind the rogue lines for extra safety. You may even shove it in the corner for the fight if needed.

Check out this article to understand how hit points work. The key thing that severely matters is not the number of hit points of damage you deal or take; it’s about how many attacks are needed for you to kill the enemy and for the enemy to kill you. This is by far the reason why extra attack is not as useful, whereas defense will matter most importantly here. You will never have an attack ludicrous enough to get you one-hit kills, whereas even taking from 3-5 to 2-4 or even 1-4 damage will make all the difference in the ease of the fights.

Whilst in other aspects of the game, such as using Hover Tanks or Turturrets in GBG, where attack% is marginally more useful, the Continent Map will always put pressure on your defense. As many players go for attack% over defense%, it is no surprise that they find themselves stuck one way or the other.
 
Last edited:

KingJMobile

Active Member
Oceanic Future

I’ll be brief here. I’m assuming you’ve just started Part 4 on the Oceanic Future Map, which is where all the higher era units from story quests end, due to a tech blocker. You can fight Parts 4 and 5 rather easily, with the newly introduced Octopods posing no pressing concern whatsoever.

Here’s a newly introduced concern: at the final stage of the OF Map, there is an introduction to the Medusa. Being a Blast Unit, they can target Hover Tanks and deal a lot of damage to them. There was one flaw with the way the AI had controlled them: as the AI tried to take advantage of their attack bonus, they targeted units closest to them. Use that to your advantage when manually fighting. Apart from that, you can just easily eliminate them on the next turns. Use Combat Drones if there are a number of them.

I also used the Hydroelectric Eel a lot more than I did with the Hover Tank; I found them much better movement and being able to move first much more advantageous than simply having Stealth on the first tile. Also given the fact that the bushes were rather common in the OF Map, they were rather useful, especially when fighting artillery units. Also, save your Hover Tanks for GBG.
 

KingJMobile

Active Member
Virtual Future

A little pre-word: due to the vastness and range of all the units, I will probably be unable to cover as much as I would like to. I assume you already know how to take out OF units and below.

Rewards​

The Virtual Future Map offers 3 expansions and quite some diamonds. VF Goods and coins and supplies are also available in most provinces.

Unit Analysis​

The Virtual Future Map is quite odd. We can see units as early as the Progressive Era there. Likewise, Hover Tanks will easily take care of any army against any units below the Tomorrow Era. Hydroelectric Eels and Sub Cruisers/Mantas may still be used against Arctic and Oceanic Future units. These lower-era units may be boosted by significant percentages, however, so wherever possible, increased attack and defense will forever be more necessary.

Boosts, then: It is necessary to be able to two-hit kill all units (barring Reactive Armor and the Ronin Bot) and take as little damage as possible back).

Against Virtual Future units, we’ll take a look:

Augmented Samurai: The Augmented Samurai is best taken out using the Turturret. As they are melee units, Hover Tanks may still work against them, as they can retaliate against the Samurai, but care should be taken as they have a great attack bonus against heavy and fast units. They also have Reactive Armor, which is a bit of a nuisance, and a fast movement too, which is very annoying. You should avoid using Combat Drones against them, as they deal massive amounts of damage without a great defense.

Ninja: Being a Rapid Deployment unit, Hover Tanks are the easiest solution for them. The Combat Drone and Eel may be susceptible to their first strikes (but still work decently strong against them, provided you have a good defense boost). In most cases, you should really avoid using Turturrets in face of them, especially because the Ninja is able to hide in forests, making the fight very difficult for them. Not to also mention their rather great attack too.

Warrior Monk: The Warrior Monk is once again a melee unit, but they have an absurdly high movement. Hover Tanks are best against them, whilst Combat Drones may take quite some damage (but can still two-hit kill them). Given their absurdly high Dug In bonus as well, you will need a very strong attack boost to two-hit kill them (mostly with Turturrets). Given their melee range, you can force them to clump together, however, which is why I feel Mortar artillery units are rather strong against them.

Ronin Bot: These can be taken out easily with both Turturrets and Hover Tanks. The only risk they pose is that they often require three hits to kill, which is why Combat Drones are rather weak against them.

Rocket Troop: As they are unable to attack Flying and Stealth units, Combat Drones and Hover Tanks are pretty much invulnerable to them, but you should still be mindful to take a bit of damage from their Mortar splash. When using Hover Tanks against them, be sure to not lose your Stealth; one unhidden Hover Tank can cost a great number of surrounding units to be punished as well. As the Rocket Troop also has a higher initiative than Turturrets, refrain from using them in the event where there are more than two of them.

Defending Army Combinations​

Any combination of Heavy, Ranged, and Fast Units: 1 Hover Tank and 7 rogues – these are the Hover Tank’s strengths. If played carefully, no damage should be done to your real Hover Tank.

Any combination of Samurai, Ronins, and other heavy units (allow 1 or 2 Warrior Monks): 4 Turturrets, 2 Rail Guns, and 2 rogues (or swap for a military drummer) – it would be much better with 8, but 4 is still enough to deal a lot of damage to them as much as possible. If there are Warrior Monks, finish them first. If played carefully, all your Turturrets should be untouched with minor injuries on one or two of your rogues.

1 or 2 Rocket Troops/Turturrets and the rest of Samurais and Ronins: 1 Turturret and 7 rogues – you should expect the Rocket Troops to pop most of your rogues. Then you should finish the Rocket Troops first and then the other units. There may be damage spread across all your units (including the Turturret).

Up to 3 or 4 other units with the rest artillery: 1 Combat Drone and 7 Rogues. Move the Drone away to prevent initial damage (from Turturrets and Rocket Troops), and push the rogues forward. This should work out very nicely.

Any other Virtual Future Combo: 1 Hover Tank and 7 Rogues. Yes, Hover Tanks absolutely rock VF; though you do need significant boosts to keep up with their attack and defense. Augmented Samurai will be the Hover Tank’s biggest problem, whilst Rocket Troops can sometimes ping your real Hover with their Mortar splash. Given that no VF units have Blast, this will be the go-to army in VF. Just make sure all your Hover Tanks are hidden. Rocket Troops will instantly punish you if you are not careful.

1 to 3 Plasma Artillery and other non-Blast units: 1 Hover Tanks and 7 Rogues (1 or 2 injured as bait for Plasma Artillery). Try and finish the Plasma Artillery as soon as possible.

Medusas and other non-Blast units: 1 Hover Tank and 7 rogues. You’ll have to test your luck on some of these. As explained in OF, the bait for Medusas are the units closest to them.
 
Last edited:

KingJMobile

Active Member
Space Age Mars

Rewards​

There is one expansion available in the Space Age Mars Map, as well as some VF goods and coins and supplies and a good number of diamonds too. The Space Age Mars map is also nowhere near as rewarding, mostly due to some provinces containing Exploration Sites that are inaccessible for players below Space Age Mars.

Unit Analysis​

Space Age Mars units are a big statistical step up from Virtual Future Units, having around double their attack and defense, with the added risk of Keen Eye, dealing a lot of damage. Boosts come in +0,50,100, and 150%, so for a Space Marine (our statistical norm), they will have 500, 750, 100, and 1250 attack and defense.

Space Marine: Turturrets with a strong attack are the best solution for them. Hover Tanks have a mild risk against them, owing to their bonus against them.

Tesla Walker: This thing will be the biggest pain in Space Age Mars. They are a threat to both the Turturret and Hover Tank as they can attack them on the first turn, and continually attack them afterward, given the AI’s annoying control of them with its Blast ability. From testing, I concluded that 9hp rogues will serve as bait for the teslas, so they should be used. The Turturret is best when fighting the Tesla Walker due to its Mortar ability.

Sentinel: Being a first striker with no Blast, just use Hover Tanks against them. Don’t use anything else against them really, or you risk taking significant damage on the first turn.

Steel Warden: Turturrets will be the best solution for them, with their string attack capabilities, but the Hover Tank still works very well against the Steel Warden, owing to their slow movement even if they cannot kill them easily.

Sniperbot: Having no Blast at all, Hover Tank is very strong against them. Turturrets are also good as they can kill them before they can move too (the Sniperbot has a rather low initiative of 15). They also have a whopping Heat ability to take out 50% of your attack, so do your best to not get hit by them (not to mention 600 to 1500 attack power).

In any case, our attack goal is to have at least our Hover Tanks two-hit kill all of the units, so have around 20% more attack power than the enemies’ defense power (excluding the Steel Warden). So you will need up to 1500 attack power on your Hover Tank, which is exactly +1150%. As I’ll mention later, if you want to deal 7-8 damage to Sniperbots, you will need to do slightly over double their defense.

Defensively, our aim is to not get one-hit killed by a Keen Eye hit (especially by the Tesla Walker in particular), which is to have 25% of the enemy attack power, which, for our Turturret (as the Hover Tank has the Force Field ability) is around a +1000% defense. It doesn’t end there though; any extra defense will always be useful.

So; 1150/1000 minimum for a relaxing time to fight the whole of Mars. Happy Days. Obviously, the defense could be much lower if Tesla Walkers didn’t have Blast lol. If you read the next section, you might also want to deal 7-8 damage to the Sniperbot, and you will need to bypass their 1000 defense by having around 2.25 times their defense, which is around a 1250 attack (so 100 extra). Note that the required boost is against SAM units at +150%. You can still survive at a lower boost in the first few provinces where the units do not have much boost.

As the artillery unit of this age (the Sniperbot) does not have Blast, Combat Drones may not have to be used in this era, as Stealth and Force Field are much more useful. In fact, we will be using Hover Tanks for most of our fights, and maybe stick in some Turturret action too.

Defending Army Combinations​

Mixes of Steel Wardens and Space Marines and up to and including 4 Sniperbots: 4 Turturrets and 2 Rail Guns and 2 Rogues. Due to the system of unit spawning, I have allowed up to 4 Sniperbots as they will come in two pairs next to each other, which means both your two pairs of Turturrets on either side can eliminate them on the first turn (you will have to be able to deal 7-8 damage to the Sniperbots for this to be able to work efficaciously).

Any combination of the 4S’s. (Sniperbots, Steel Wardens, Sentinels, and Space Marines if you didn’t get it): 1 Hover Tank and 7 Rogues. Play carefully, and you should expect to receive no damage done to your real Hover Tank. If there are no Space Marines, you can even receive no damage when played carefully and have the necessary attack boost.

Your Martian Nightmare V1 (Tesla Walkers with mixes of Steel Wardens and Space Marines): If there are 4 Tesla Walkers, use 2 Turturrets with 6 9hp Rogues. Eliminate the Tesla Walkers first before sorting out the other slower units. 2 Turturrets here are better (I predict) because more Turturrets mean an easier time against the light and heavy units.

Your Martian Nightmare V2 (Tesla Walkers with mixes of other units): 1 Hover Tank and 7 Rogues (allow a couple slightly injured ones). If there are Sentinels, your real Hover may be in luck as the popped rogues will then serve as bait for the Tesla Walkers (hopefully). Prioritize eliminating the Tesla Walkers first. Then the Sentinels, Space Marines, Steel Wardens, and then the Sniperbot.

Your Martian Hell (Pure Tesla Walkers): 2 Turturrets and 6 9hp Rogues with a lot of pain for your rogues. Due to the AI's weird control of the Blast units, you should not expect your real Turturrets to get injured until all rogues are dead. Afterward, use the Turturrets' Mortar advantage to eliminate the Teslas.
 
Last edited:

KingJMobile

Active Member
Space Age Asteroid Belt

Congratulations on making it past the Space Age Mars. Welcome to the Space Age Asteroid Belt, where once again 3 units forgot how to do ranged attacks (lol).

Rewards​

Only 1 expansion along with the usual diamonds and SAAB goods. Once again, we have the totally useless Exploration Sites.

Unit Analysis​

In the first few provinces, there is a mixture of SAM and SAAB units which are boosted by +160%. In the second part, there are only SAAB Units which are boosted by +170%.

Drill Ranger: Augmented Samurai 2.0. Turturrets will be the best units against them, as ever. Being a melee unit, Hover Tanks still work very effectively against them, however, but caution should be taken with their serious attack strength. Combat Drones should stay out of their range wherever possible.

Nail Storm: Fortunately, the Nail Storm doesn’t have Blast, so Hover Tanks are therefore the best solution for them. Having a greater initiative than Turturrets and the added Stealth will make the Turturret rather weak against them. If anyone remembers Anti Materiel Snipers in TE, the Nail Storm is particularly reminiscent of them. Combat Drones will take the most damage from them.

Hover Hammer: Once again, Hover Tanks will be the best solution for them. Unlike previous Flying units, the Hover Hammer cannot attack the first turn and has a melee range, so you can safely allow a couple when using Turturrets (using rogues to finish them off). Combat Drones should best stay out of their range wherever possible.

Shredder: The Shredder has the shortest reach (that is, tiles of maximum movement and range put together) of all SAAB units, and they can only attack units at a maximum distance of 8 tiles, which means they can just about attack the Combat Drone if their path to them was all plains. As the Hover Tank negates their range by having Stealth, the Shredder can be easily outranged and outmaneuvered by all units we’ll be using to fight.

B.E.L.T.: The BELT is most reminiscent of the Plasma Artillery to Hover Tanks. This time, they’ll be running at a dangerously strong attack, so Hover Tanks will need a very great defense boost to withstand their dangerous attacks. If you thought Tesla Walkers proved difficult, the BELT with its almost double attack (bonuses included) will be the ultimate nightmare for them here. Meanwhile, the Combat Drone will be used against many BELTs, as they are immune to their attacks. Fortunately enough, the BELT has a lower initiative than Turturrets, so they are also strong against them provided they are eliminated quickly.

Calculations, then. Our attack% goal is to be able to two-hit kill Hover Hammers at +170%, which is a needed 1890 defense to bypass. Therefore, your Hover Tank will need around 2000 attack power, which is (rounded) +1600% attack. If you want to deal 7-8 damage to BELTs with Turturrets, you will need to bypass their 1485 defense. Multiply that by 2.25 and you’ll need around 3350 attack power, which is a +1900% attack boost. Incidentally with that too, your rogues can also two-hit kill Hover Hammers.

Defense-wise, you want to survive at least three hits from BELTs when using Hover Tanks (as Hover Tanks have Force Field, the defense can be lowered). BELTs have 2325 attack power (bonus included) against Hover Tanks, so you will need at least 2000 defense on your Hover Tank, which is also +1600%.

1600/1600? Sounds a bit tough doesn’t it? (I think you can still survive slightly lower; SAAB units are fairly weak).

Defending Army Combinations​

Anything with No Tesla Walkers or BELTs: 1 Hover Tank and 7 Rogues. When played carefully, you should expect no damage to be done to your real Hover Tank.

4 or more artillery and other units: 1 Combat Drone and 7 Rogues. Just make sure the artillery transforms as many rogues as possible before targeting the slow units.

Artillery with Sentinels, Tesla Walkers, or Nail Storms (may or may not include other units): Take a risk assessment to decide between Combat Drones or Hover Tanks. Every BELT and Tesla Walker is a threat to the Hover Tank, whilst the other three are a threat to the Combat Drone. Remember that if you are up against Blast units, have some injured rogue to avoid your real unit from being damaged.

Light and Heavy units and up to 4* artillery units and 2 Hover Hammers: 4 Turturrets and 4 Rogues. Read the SAM bit to understand why I’ve allowed up to 4 artillery (but you’ll have to deal 7-8 damage to them for this to work). Then focus fire on the light and heavy units. If you can’t eliminate the BELTs, you can use Combat Drones.
 
Last edited:

KingJMobile

Active Member
Afterword

As you might see, I was in a bit of a rush to post this. Please let me know your feedback; I will update it soon. I'm keeping this nice and short. I'll also a changelog because why not :)

v1.0.2 (15th October 2022) – Did some testing and now I've got some ideas on board.
v1.0.1 (18th July 2022) – New army combo which I used: 4 Turturrets, 2 Rail Guns, and 2 Rogues (sometimes swapped for a military drummer)
v1.0.0 (21st June 2022) – Posted the guide
 
Last edited:

UBERhelp1

Well-Known Member
Looks awesome! I've been taking it slow on the cMap while sitting in FE/AF, and I'm currently on the SAM map. The Keen Eye makes an otherwise straightforward battle really painful. If it hits at the wrong time it could completely throw the whole battle. I've won one wave of a two wave battle only to get my hovers wrecked with keen eye on the second wave. If you want to play it safe, make sure you heal between waves. Especially if you're coming from InA/PE, the Virgo Project might not actually be a bad investment. If you start a battle and surrender if it doesn't work, you could save yourself a lot of attack boosts and punch much higher above your weight.

Also, if you're in InA/PE with hovers, I'd recommend not placing the AO until you age up. Unless you're using units of your age, the AO is useless other than the FP and the space could be better taken up with buildings that give attack boosts.
 

KingJMobile

Active Member
Looks awesome! I've been taking it slow on the cMap while sitting in FE/AF, and I'm currently on the SAM map. The Keen Eye makes an otherwise straightforward battle really painful. If it hits at the wrong time it could completely throw the whole battle. I've won one wave of a two wave battle only to get my hovers wrecked with keen eye on the second wave. If you want to play it safe, make sure you heal between waves. Especially if you're coming from InA/PE, the Virgo Project might not actually be a bad investment. If you start a battle and surrender if it doesn't work, you could save yourself a lot of attack boosts and punch much higher above your weight.
Sound advice Uber. I'm imagining only Tesla Walkers create some trouble in SAM. Hovers would work amazingly otherwise lol. I guess it's just the usual A/D that needs improving. 1150/1000 for a comfortable time on Mars lol. As I can see it, you can get up to 2150 tiles(?) in PE, so you'd have to be setting your city to around 0.5 atk and def per tile lol. It should be somewhat achievable.

Also, if you're in InA/PE with hovers, I'd recommend not placing the AO until you age up. Unless you're using units of your age, the AO is useless other than the FP and the space could be better taken up with buildings that give attack boosts.
Pity I built my AO too soon o_O.
 
Awesome!
You should consider Battle Fortresses too:
_C__Users_Computer_Documents_Forge%20of%20Empires%20-%20First%20SAM%20province%20with%20'highe...jpg
(This is the first province of SAM btw, no Kraken or Virgo activated)

My boost is 400/300ish at that time, and all rogues were made slightly wounded (all lost just 1 bit of health before this), and these bulldogs attack them instead. Hallelujah!
Right now I'm on SAM provinces with 100% boost, and while some sectors still very easy, most are not especially with rather low 450/350 boost. I think I am gonna skip for while until I got sufficient boost.
UBER is right, you will need Virgo and from me, Kraken as well to make some battles (like 2 waves with many Teslas) feasible without any diamonds, and in that case, 6 Eels (damn it Inno)+2 Recon Raiders should do a nice job to finish the rest.
 

KingJMobile

Active Member
Awesome!
You should consider Battle Fortresses too:
View attachment 19661
(This is the first province of SAM btw, no Kraken or Virgo activated)

My boost is 400/300ish at that time, and all rogues were made slightly wounded (all lost just 1 bit of health before this), and these bulldogs attack them instead. Hallelujah!
Right now I'm on SAM provinces with 100% boost, and while some sectors still very easy, most are not especially with rather low 450/350 boost. I think I am gonna skip for while until I got sufficient boost.
UBER is right, you will need Virgo and from me, Kraken as well to make some battles (like 2 waves with many Teslas) feasible without any diamonds, and in that case, 6 Eels (damn it Inno)+2 Recon Raiders should do a nice job to finish the rest.

Great results with the BForts; well done. I must say I rather didn’t initially include the Battle Fortress because I thought it would be outclassed by the Hover Tank, but nonetheless it’s nice to use something other than Hovers these days.

I guess they would work if you haven’t got much defense, but overall I would still prefer Hovers predominantly because Force Field is much better than Reactive Armor 3 below 5 damage.

Still, I reckon you’ll need to increase your A/D for the map ahead.
 

KingJMobile

Active Member
I'd agree with this. You have to remember that while the units on the map may only get slight increases in attack boost, the base stats are so much higher that those small increases hit hard.
Nice point Uber. Things really get tough especially when Mars units have literally doubled the stats of VF units, which is a big jump. I’m only at the first stage of VF taking my time, and my 580/640 is still running very strong. I think that could get me past all of VF, actually, and the first few provs of Mars.

If nobody minds, I will be also writing a sort of journal thingy about how I’m going to gain more attack and defense. It’s been growing greatly since Wildlife started and waiting for Fellowship and potentially a strong summer building could get me a couple hundred more (if all goes well: I won’t be spending diamonds).
 

spartacus2.0

Well-Known Member
Your Martian Hell (Pure Tesla Walkers): 1 Hover Tank and 7 Rogues with a lot of pain and diamonds lost. Make sure to shove your real Hover Tank and force it to stay there into the corner before attacking the Tesla Walkers. Try and use the in rogue, out Hover Tank tactic to make sure the rogues are eliminated first. Turturrets may be used to maximize their attack advantage instead. I have yet to face the horrors of this army; however, I’m not entirely sure as to whether this army combination will come up though (let’s hope it doesn’t).
*Flashbacks of getting slaughtered by eight Tesla Walkers while using Hover Tanks in PvP Arena*
 

KingJMobile

Active Member
Project 1K

I have planned to try to gain as much attack and defense as possible in Progressive Era. Around 2000 tiles are available in Progressive Era, assuming you have taken all of the expansions from the Continent Maps to OF and left a few diamond and Victory Expansions out. Doing the math, up to 2240 tiles are available in PE up to VF CMap and an additional 64 for all the Space Ages.

I have 640/710 as of now, which is ever-increasing. I also have 2016 available tiles so far, 1930 of which have been used (that's also counting the crap I have in my city too), so my efficiency will need a big ramp-up indeed.

Now, I aim to get a +1000% attack and defense boost in PE. Assuming 2000 tiles are available in PE, you will need around 0.5 att and 0.5 def per tile of space. This is important when considering what buildings to get. To simplify this, however, I shall include the total army boost provided by each building, and the expectation will be 1.

I will make a list, therefore, of the buildings that can either exceed or impede the expectation.

Exceeds/Above ExpectationImpedes/Below Expectation
Castle System & Tavern Boost – Both my Level 8 Castle System and Tavern Boost provide an extra 25% to both attack and defense, which is nice. It should just about make up for the Town Hall.Town Hall & Roads – Improve your road efficiency wherever possible. Every inch of unnecessary road is a waste of space.
SoZ, CoA, CdM, and TA – As a priority, I’ve leveled all four of these GBs to maximize the initial phase of army boost. I have also planned to level them higher, as more levels mean more army boost with no cost of space. I intend to level them using 1.9 threads, as my CdM has just entered the 1.9 priming phase, whilst my other three GBs are sitting just past level 10. All my FPs will be going into those GBs for now. Assuming I get these to level 60, they will provide a total of 210 attack and defense, which is over a fifth of the requirement, and enough to make up for the inefficiencies around my city.Other Great Buildings – Any GB that doesn’t provide an army boost will be a hindrance to the 1k mission. Some GBs, such as the Arc and Alcatraz, should be kept for obvious reasons, whereas other optional GBs should ideally not be built. Some GBs which I am unsure whether to delete include the Temple of Relics and Arctic Orangery: they are sitting on low levels and are very low on my priority list for leveling. As I have had a protest from my guildmates about this issue, I will decide to keep them: space is not yet a great issue for me, and it fits quite well with my city layout
Eagle Mountains – I have spent 1500 diamonds on tickets so far and combined with my strategy for timing and in the minigame, I managed to get 3 extra (total 4) which to me is a pat on the back. The Eagle Mountain is probably the best attacking- army event building there is currently. It goes up to 1.6 combined attack% and defense% per tile.Production buildings — ideally you should keep them to the minimum, but I do have quite a lot of them right now (predominantly for quests).
Heroes Tavern — Also a very strong army provider. In PE its total boost is higher than the Eagle Mountain, but it trades some attack for defense. I will be targeting this and Eagle Mountain.Other Event Buildings — in PE all event buildings do not reach 1 att/def per tile. Recent event buildings are usually close to that, however, and I will keep them as they also provide FPs and goods.
Sentinel Outposts (2 or 4) – this is the best building for defense%. These can serve as our long-term solution, but we cannot rely on them too much as they are very slow to boost us at a relatively good speed. As these appear in almost every event, I will not hesitate to spend on them. These will have the biggest impact if I ever do get enough of them.Winner’s Plaza (and the alike) – 0.89, but counting the roads, it would be at around 0.76 in PE. (Even lower in Industrial). I will be avoiding them. (I also happen to dislike people who farm WPS).
Harvest Farm Set & Butterfly Sanctuary Set – I have a layout for both of these sets to greatly increase my attack%. The Wheat Field and Wildflower Meadow will be predominantly used. I will possibly be spending all my ingredients on the set during the Fall Event.Other Sets — I normally refrain from building other sets as even the manipulated versions don’t quite achieve 1 attack/tile. Every little bit helps, but acquiring these over other items I’ve listed on the left isn’t preferable for me.
Olive Tree Path and Rocky Path — are the only two chain decorations that fulfill the needed efficiency. These probably won’t come up for the next year, but I did manage to get a bunch. I will focus mainly on the attack% one, but I will also get a couple of the defense%.Other Chain decorations — the second best chain decorations for army boosts are the Cypress Passes and Olive Groves. They are now available on auction and I have a number attached to my Terracotta Vineyard. Even though they run at 0.8 efficiencies, they are a good boost as long as you are not short of space.
House of the Wolf — The first all-time 2-in-1 army provider. Unfortunately, it's part of the Halloween Event, and we all know it's hard to get Daily Specials there, but I will try and get them if possible.Faces of Ancients and Gates of Sun Gods — As space is not an issue, I still have a shedload of them spaced out on non-road zones in my city. These have served me well, and should the time come, I will eventually remove them.
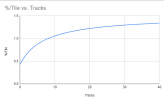
Hippodrome with Rousioi Tracks — (look at Uber's graph below). As far as this is concerned, the Hippodrome tracks may make a decent army provider, but you will need both the buildings and a number of tracks for this to really work efficiently. Random Stuff I have in my city — this includes Wishing Wells, my Surveillance Nexus, and even the Gate Statues which I place as temporary placeholders for nothing but memes in my city. I will have a think about selling them should space be a critical issue.
 
Last edited:

UBERhelp1

Well-Known Member
I notice you haven't said anything about the hippodrome. If you have the space, it approaches 1.5 attack defense per tile the more tracks you place, and it reaches exactly 1%/tile after only 8 tracks. It's better than the mill, vineyard, etc., however sentinel outposts are technically more efficient.

1657731854153.png
 

KingJMobile

Active Member
I notice you haven't said anything about the hippodrome. If you have the space, it approaches 1.5 attack defense per tile the more tracks you place, and it reaches exactly 1%/tile after only 8 tracks. It's better than the mill, vineyard, etc., however sentinel outposts are technically more efficient.

View attachment 19732
Good point. I'll definitely add that in once I have time (gotta go to bed soon). I'm not really a fan of the Hippodrome Tracks as the road organization digs my head (and it takes quite a number of pieces).
Not to rain on anyone's picnic but the age of "if it ain't attack throw it back" may have run it's course. A more balanced approach could be the way of the future. Not that this would be a bad thing.
Do you mean aiming for a 1:1 ratio with attack and defense? Yeah, that's one aim. I'm going to be tanking def% wherever possible really. Partly because of the CMap ahead. Mostly for trolling.
 

KingJMobile

Active Member
I wanted to post this on my wall, but due to some weird 420 limit, I'll have to post it here.

Keeping track for no reason.

2021 1st December – Higher Era Unit trek begins
2021 Christmas – MG Teams in Industrial Age
2022 30th January – Combat Drones in Industrial Age
2022 19th February – Hover Tanks in Industrial Age
2022 24th February – Aged up to Progressive Era because I ran out of techs
2022 2nd May – Acquired every single higher era unit in Progressive Era
2022 19th June – Entered the VF Continent

TBC – Finish VF Continent
TBC – Project 1k
TBC – The PE Metropolis
TBC – The Space Age Maps...
TBC – Rule the world with my extreme power until I get bored and age up to PME and complete the PME tech blocker.
 

Sharmon the Impaler

Well-Known Member
8 eels made a mess of Tesla walkers for me when I was clearing the map. They attack the whole field on their first attack and they attack first and pack a wallop if your boost is good. No rogues , they are attacked last and will only get you defeated on the map at this point.
 
Top